Delivery of elements
5 working days before the date of posting your campaign or the sending date of your emailing
For a subdomain delegation, 10 working days before the date of sending your emailing
General terms and conditions :
Any non-compliance with the technical specifications will result in a non-diffusion of the campaign :
clicktag non-functional, high weight, https protocol not respected, ... Any failure to respect the deadline for the submission of the elements may lead to a delay in the diffusion of the campaign. Leboncoin Publicité can not be held responsible for the non diffusion or the delay of diffusion the campaign as a result of non-compliance with the technical specifications and / or the deadline for items by the advertiser..
Regarding emailing campaigns, these deadlines allow us to ensure the proper functioning of your sender and the compliance of your creation.
Failure to comply with the deadline may result in a delay in the dispatch date of your campaign.
Technical specifications
Dimensions
The requested dimensions are always in pixels and 72dpi.
Files weight
Maximum authorized weight : > 50Ko
This weight limit ensures that your advertising is displayed to all visitors regardless of their type of connection
HTML 5
The elements to provide
- A zip file containing the elements of the banner (html, css, images ...).
- Or the link to the hosted banner.
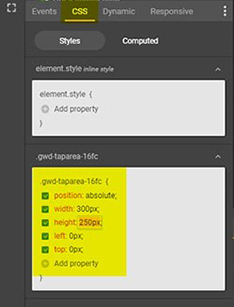
Dimensions
Use the size meta tag to indicate the intended size for your creative and ensure your creative renders at the right dimensions
<meta name="ad.size" content="width=[x],height=[y]">
- the meta tag is inserted in the
head tag of your HTML file
- [x] [y] are pixel values
HTML5 creatives can only have fixed dimensions (970*90 768*90 320*50 …).
Dynamic sizes such as "Fluid" aren’t supported.
For creative HTML files in Google Web Designer bundles, the minWidth and minHeight properties of the creativeProperties parameter must be non-zero. For example, "creativeProperties":{"minWidth":0,"minHeight":0,"maxWidth":0,"maxHeight":0} results in an error.
Example :
Here's an example meta tag for a rectangle 300*250 :
<meta name="ad.size" content="width=300,height=250">
Videos
| Codec |
Extension |
Video bitrate |
Audio bitrate |
Recommended duration |
Maximum recommanded weight |
| h264, vp9, theora |
mp4, webm, ogv |
600 kbits/s |
96 kbits/s |
15 seconds max. |
2 mo |
The sound must imperatively be toggled by click and not with a mouse over the banner.
Videos without sound control are blocked by web browsers.
If your video has sound, your creative becomes interactive. In that case you will need to set the click tag yourself.
In that case you will need to set the click tag yourself. (see How to implement a clicktag)
Inside the video tag, don't forget to fill the attribute poster=« image.jpg » that can display an image as long as the video has not been played.
Depending on the browser and/or the phone of the user, the video may not display correctly. The integration of the poster allows to ensure the display of the banner on all media.
HTTPS protocole
Agriaffaires, MachineryZone and Truckscorner sites use the HTTPS procotole to secure and make your sites more reliable.
Absolute URLs* must be called in HTTPS only. It will therefore be necessary Make sure your hosting platform is compatible with this protocol.
URLs called in HTTP will systematically result in the non-publication of the banner.
*Absolute URL : call files on remote servers such as code libraries or images.
Example :
<img alt="" src="https://mon-serveur.com/mon-image.jpg ">
Clicktag
The click tag is the click-through URL of your creative which the user will be redirected when clicking.
When to set the clicktag?
We can define the URL through the Ad Manage if your creative is hosted and if you want the entirety of it to be clickable .
In the situation where you provide us a zip file and/or you want to target an element inside your creative to be the redirection (because your creative is interactive for example) you will need to set the URL yourself in the HTML.
How to implement a clicktag?
With Google Web Designer or HTML5
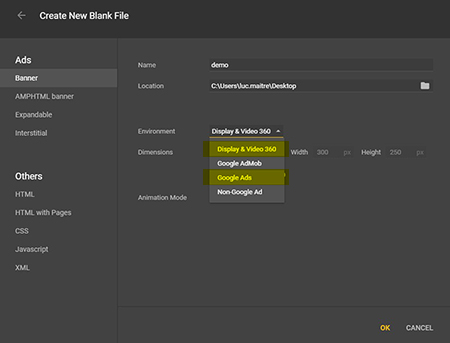
1. Google Web Designer
Make sure to set the project environment as a Google Ads or Display & Video360
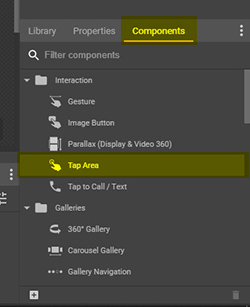
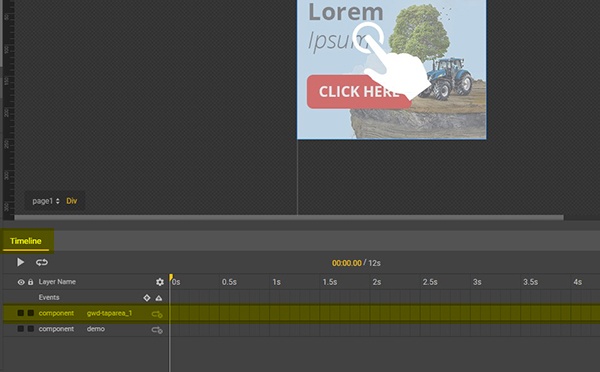
Once your creative is done, go to the components panel and insert the Tap Area component.
Make sure that the Tap Area component is set on top of the layers in the timeline.
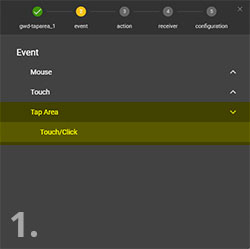
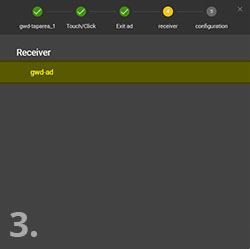
Go to the Events panel and click on the at the bottom.
- Then select the Tap Area in the list
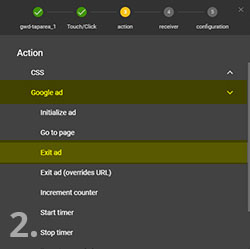
- On the action tab choose Google ad option and exit ad
- On the receiver tab choose gwd-ad
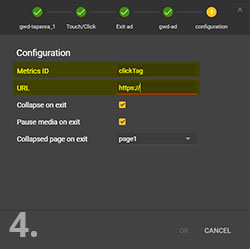
- Finally on the configuration panel
- Metric ID: clickTag
- URL: The destination URL of the ad
2. HTML5
To achieve this, past the following code in the head tag of your HTML.
Fill in your URL in the destUrl variable.
<head>
    <!--Set the intended size for your creative-->
    <meta name="ad.size" content="width=300,height=250">
    <script type="text/javascript">
        // Fill in your URL here
        var destUrl = "http://www.yoururl.com";

        // Collect clickmacro
        var queryString = window.location.search;
        var urlParams = new URLSearchParams(queryString);
        var clickMacro = urlParams.get("click");

        // Clicktag generation
        if (clickMacro === null) {
            var clickTag = destUrl;
        }
        else {
            var clickTag = clickMacro + "?&adurl=" + destUrl;
        }
    </script>
</head>
Refer the clickTag variable to the tag that contain your Click To Action
<a href="javascript:window.open(window.clickTag)">Click here</a>
If the redirection is global to the creative it will be necessary to contain the whole of it
<body>
    <a style="display:block;" href="javascript:window.open(window.clickTag)">
        [YOUR CREATIVE HERE]
    </a>
</body>
The click tag should be easy for the Ad Manager to read — no minification or obfuscation
Do not use hard-coded click-through URLs in your asset because it prevents the Ad Manager from tracking clicks and prevents traffickers from updating the URL.
Expand
For an expand banner you need to provide 2 files (link or zip)
- 300*600 which is the collapsed state of the expand
- 900*600 max. which is the expanded state of the banner
- The expansion is only by click.
- The expanded banner is displayed instead of the initial one and will spread on the left side.
Collapsed state
1165
Expanded state
We recommend you to download the expanded state template.
Clicktag
If you want to set a clicktag in your creative, set the URL in the DesUrl variable
var destUrl = "http://www.google.fr";
Refer the clickTag variable to the tag that contain your Click To Action
<a href="javascript:window.open(window.clickTag)">Click here</a>
Tracking pixels
10 tracking pixels are available. The first one is reserved to count the display of your expand.
You will be able to use the 9 others tracking pixels for your creative. SuiviImpression1...SuiviImpression9
You can either use these on mouse over
<div id="SuiviImpression1" onmouseover="javascript:changePixel(this.id);">interaction</div>
or on click
<div id="SuiviImpression1" onclick="javascript:changePixel(this.id);">interaction</div>
If you used some of the tracking pixels, don't forget to tell us which ones to let us link them on the ad server.
Closing button
The close button is managed automatically by the ad server and will be placed on the upper right corner of the expanded banner.
Emailing
Standard Deliverability rules
Only one html file must be provided without any other files or directories
Structure
1190
Images
1192
Header informations
1194
Why do a subdomain delegation?
Subdomain delegation is mandatory for the creation of a custom sender.
It also makes it possible to personalize the links in the emailing with the name of the brand.
Subdomain delegation is therefore strongly recommended for two reasons :
- To reassure the users since all urls inside the email will be with the brand name
- Optimize the deliverability of emailings because each personalized link benefits from the reputation of the subdomain.
Advanced settings (optional)
Add mso tags for optimal compatibility on Outlook email clients, yahoo, etc.
Appendices
Google Analytics
If you have a Google Analytics account, we recommend you to follow the steps below to measure the performance of your campaign on Google Analytics.
1. Use the following URL builder : https://ga-dev-tools.appspot.com/campaign-url-builder/
2. Fill in the required fields
Website URL : The full website URL
Campaign source : The referrer (Example : Agriaffaires, Machineryzone, Agritel) (Example : Agriaffaires, Machineryzone, Agritel)
It is also possible to fill optional fields :
Medium : Format used
Name : Campaign Name (Special promotion, open door days, product...)
3. Click on Convert URL to short Link and recover the generated link